
There are some questions that we get asked regularly so we’ve put together a handy overview of all our most asked questions! They are:
- Which baby carrier is right for me?
- When is my baby ready to face outwards?
- What are the sliders/buttons for on the front of my carrier?
- My carrier is uncomfortable to wear – help!
- How do I make sure my baby is seated in the hip-healthy ‘M’ position?
- Can I use my Omni Breeze, Aerloom or Cool Air Mesh fabric carrier in cooler weather?
- How do I dress baby for summer babywearing?
- How do I dress baby for winter babywearing?
- Can I use my carrier when pregnant?
- Can I babywear after a c-section?
- Can I breastfeed in my carrier?
- I can’t reach the back strap to do it up by myself – help!
- How do I correctly use the neck support?
- Me and my partner are different shapes/sizes, what sizes do your carriers fit?
Which baby carrier is right for me?
Your baby carrier should sync with your lifestyle and personal style. So whether you’re an on-the-go outdoor adventure family or need a carrier for neighborhood walks and summer travels, your baby carrier needs to meet both yours and your baby’s needs. You can check out our Which Carrier is Right for You? Quiz to find the best baby carrier for you HERE.
When is my baby ready to face outwards?
Our Embrace, All Position 360, Aerloom and Omni carriers all offer outwards facing mode once baby is developmentally ready. Every baby develops differently but you can start wearing your baby facing out once your baby demonstrates all the following: strong head and neck control, starts showing interest in the world around them and chin is above the carrier panel. This is usually around 5-6 months. Make sure to widen the seat to the widest setting (Blue Velcro setting) when baby is facing out: adjust the slider adjustments to the inner setting (toward the centre of the carrier) or use the grey buttons if your carrier has buttons in place of sliders. In outward facing position, baby’s arms should always come out the sides of the carrier above the shoulder strap attachment point NEVER out of the top edge of the carrier above the neck support. If baby gets sleepy or shows signs of overstimulation, turn baby around to face you. Baby should be removed completely from the carrier for repositioning. We recommend the facing out position to be used for shorter durations of carrying only, around 20 minutes.
You can read our Top Tips For Outward Facing HERE and as a bonus tip, baby is ready to be worn on your hip or back (where your carrier supports this) once they demonstrate strong head and neck control, can sit unassisted, and weighs 17.2 lbs minimum (7.8 kg). This is usually around 5-6 months.
What are the sliders/buttons for on the front of my carrier?
You can adjust the buttons or sliders (depending on your carrier model) on your carrier narrow the seat to make it more comfortable and hip-healthy for babies in the outwards facing position.
- You should use the black buttons for front inward facing, hip and back carry modes
- You should use the grey buttons for front outward facing mode only
- Sliders should be on the outward setting (slide ‘up‘ towards the outer edge of the carrier) for front inward facing, hip and back carry modes
- Sliders should be on the inward setting (slide ‘down‘ toward the center of the carrier) for front outward facing mode only
My carrier is uncomfortable to wear – help!
The good news is that this can likely be fixed with some very simple adjustments to how you wear your carrier or position baby in it. Try checking out the instruction videos for your carrier on our website HERE, or get in touch with us either via Instagram or Facebook or email our customer support team at [email protected] – they are all trained babywearing consultants!
How do I make sure my baby is seated in the hip-healthy ‘M’ position?
After securing shoulder straps, always make sure baby’s bum is evenly centered in the carrier. Reach inside the carrier and rotate baby’s hips into a seated position, sinking baby’s bum deep into the carrier to encourage a comfortable natural spine position (slightly rounded, C-shape). Then squat baby’s legs to make sure baby’s knees are positioned higher than baby’s bum for a proper spread-squat position (M-Position). Finally, pull the seat sides (padded thigh area) out on either side ensuring the fabric/padded area under baby’s thighs reach from knee to knee. We call this a pelvic tuck.
If you’re more of a written instructions kind of learner, then scroll down for a handy graphic.
Pro tip – save the images to your camera roll for easy double-checking while you’re out and about as it’s a great idea to do a pelvic tuck every time you pop your baby in the carrier.
Front Inward Facing
| 1. | 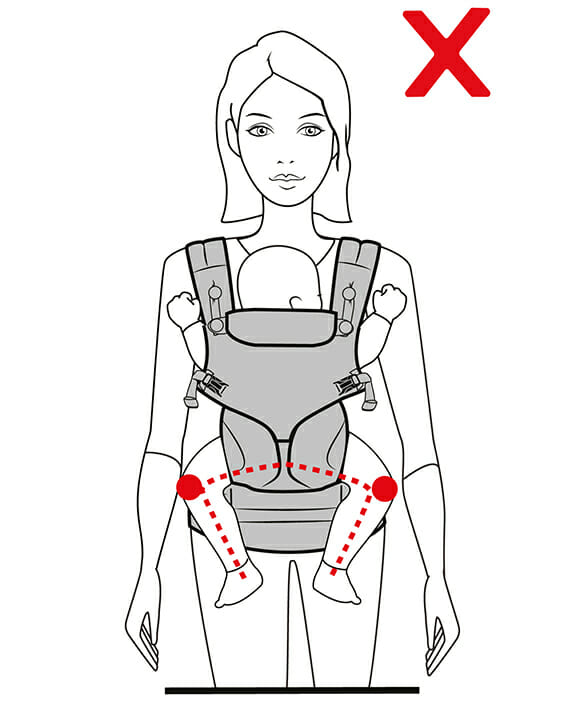 |
We recommend doing a pelvic tuck every time your baby goes into the carrier but here’s a couple of visible signs you can look out for:
|
| 2. | 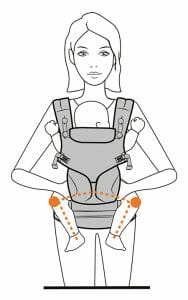 |
Insert hands under your baby’s upper thighs. |
| 3. | 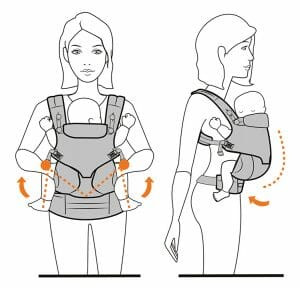 |
Rotate your baby’s hips towards your body to sit them deeper into the seat. Weight should be on the baby’s bum with the knees higher than his/her bum. This forms an “M” shape. |
| 4. | 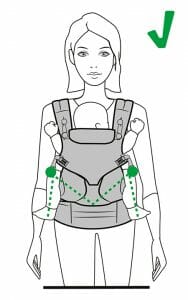 |
Your baby should now be seated comfortably with the carrier supporting them from knee to knee. |
Outward Facing
| 1. | 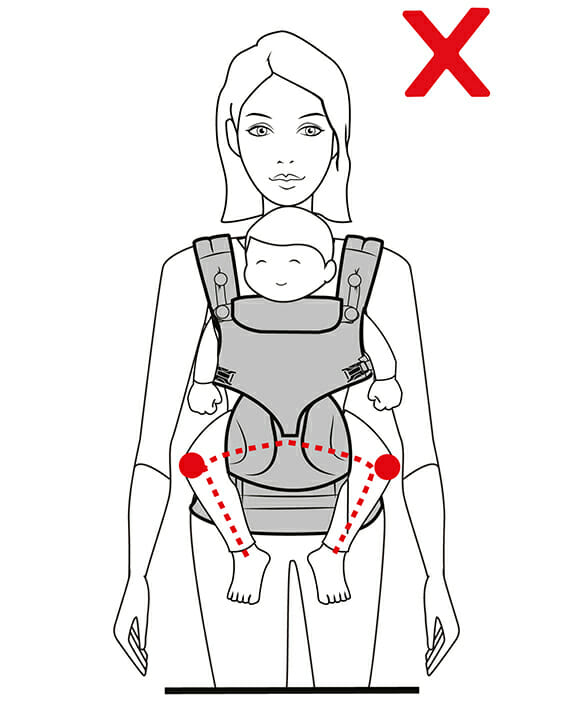 |
We recommend doing a pelvic tuck every time your baby goes into the carrier but here’s a couple of visible signs you can look out for:
|
| 2. | 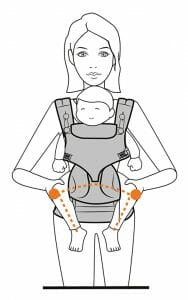 |
Insert hands under your baby’s upper thighs. |
| 3. |  |
Rotate your baby’s hips away from your body to sit them deeper into the seat. Weight should be on the baby’s bum with the knees higher than his/her bum. This forms an “M” shape. |
| 4. | 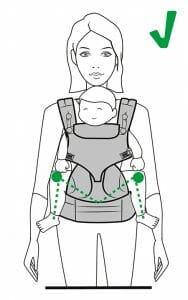 |
Your baby should now be seated comfortably with the carrier supporting them from knee to knee. |
How do I dress baby for summer babywearing?
No matter the season, layers are key! Your carrier or baby wrap acts as one layer of clothing, so it’s important to keep both you and baby lightly dressed when using your carrier. Although of course this being Britain we recommend an extra layer or two in your change bag just in case the weather changes! Fabrics made of natural fibers such as bamboo or cotton are the fastest drying and are breathable, so can help keep baby cool. And don’t forget sunshades and a sunhat! If baby doesn’t like to wear their sunhat, wearing one with a wide brim yourself can help keep baby shaded too, and most Ergobaby carriers (except for Embrace and Aerloom) come with an integrated sunhood folded into an open or zippered pocket on the outside of the main carrier panel. This can be attached to one side or both sides on the shoulder straps, to allow flexibility. You can read our Top 5 Tips for Summer Babywearing HERE.
How do I dress baby for winter babywearing?
Dressing baby in too many layers of clothing could cause them to overheat, so start with fewer layers and add more if you feel baby is too chilly. When dressing baby, remember that your carrier counts as a layer of clothing and so do you as your body warms them up – particularly as your temperature is likely to increase as you’re carrying baby, along with any number of parenting essentials! You can read our Top 5 Tips for Winter Babywearing HERE.
Can I use my Omni Breeze, Aerloom or Cool Air Mesh fabric carrier in cooler weather?
Absolutely! When the weather is cooler, you can dress baby with warmer layers in the baby carrier. We also recommend getting the Ergobaby All-Weather Cover or Rain Cover (not compatible with Aerloom) to provide additional warmth and protection from the weather elements.
Can I use my carrier when pregnant?
Many women have safely used the Ergobaby carrier throughout their pregnancy. However, this is very much an individual preference and we recommend you consult your health care practitioner if you choose to continue to carry your child beyond your fifth month of pregnancy. You can find out more HERE.
Can I babywear after a c-section?
As with all our advice, it isn’t designed to replace that of your Healthcare Professional so do check in with them if you have any concerns but most people can successfully babywear after a c-section. The waistband of your carrier should sit high up on your waist to avoid any tender areas. Or, if you haven’t tried our Aura Baby Wrap, the material is soft, cosy, and lightweight which may be ideal for you as it won’t put too much pressure around your waist or any scarring you may have. The compression of the wrap may even feel supportive and helpful or you can try tying off the wrap above your incision if you’ve had a C-section.
Can I breastfeed in my carrier?
Yes, you can breastfeed while on the go in all Ergobaby carriers! This can be done in the front facing in carry positions. Just loosen the shoulder straps a bit and slightly lower baby to position on your breast. For safety, we recommend staying seated when nursing in a carrier. Always stay vigilant while baby is nursing, and reposition after feeding, so baby’s face is not pressed against your body. Move baby back to recommended carrying position, remove slack from straps, adjust and you’re good to go!
I can’t reach the back strap to do it up by myself – help!
Loosen the shoulder straps prior to putting shoulder straps on and fastening the chest buckle. This will give you sufficient slack in the straps to easily reach the Chest Strap buckle behind your head/neck, without having to reach down your back. It is critical to maintain enough tension on the shoulder straps to keep baby secure while attaching the Chest strap buckle.
You can also try using the Omni Breeze or Omni Dream baby carrier with crisscross straps when in the front carry position with baby facing parent or facing out as there is no need to reach in the back to buckle/unbuckle the chest strap: all the fastening and tightening is done on the front.
Lastly, you can try the “T-shirt method” of putting on the carrier. This allows the chest clip to already be fastened before you put on the carrier. We recommend watching our instruction video on “T-Shirt Method” for step by step instructions.
Or, if all else fails, you can wear your straps crossed where your carrier supports this function. You can wear the shoulder straps crossed on your back in the front carry position, with baby facing in or facing out. Wearing crossed straps or parallel straps is individual comfort preference. The crossed straps allow you to easily position the shoulder straps where it is most comfortable for you to wear them on your shoulders, which makes it a great feature for parents with narrower or wider shoulders. It is also appreciated by parents with less mobility as you don’t need to reach in the back to fasten and tighten the chest strap, as all the buckling and fastening is done on the front.
How do I correctly use the neck support?
Until your baby has demonstrated strong and consistent head and neck support, her/his head needs to be supported. Ensure the top edge of the carrier is at your baby’s mid-ear level for proper support by positioning baby higher or lower on your body, when pulling the body of the carrier up around your baby’s back. For a newborn baby, 6 weeks and under (minimum 7 lbs / 3.2 kg), fold the head and neck support on the inside, and button it to the lower buttons on the front from the side using the tabs for a tighter support. When baby starts to turn head from side to side and to hold his head for a few moments, you can fold the neck and head support on the outside and button it to the lower buttons. This usually happens around 7 weeks. For older babies, you can also button up the head and neck support for extra support when needed, such as when she/he is sleeping. When wearing your baby facing out (min 14 lbs/6.4 kg), make sure the head and neck support is folded down on the outside and buttoned to the lower buttons, and that your baby’s chin is over the top edge of the carrier body. We recommend watching the instruction videos for step by step instructions.
Me and my partner are different shapes/sizes, what sizes do your carriers fit?
The Omni Breeze baby carrier fits most sizes (XS-XXL), for example, on our Omni Breeze carrier the waist belt range is from 25.6 in/65 cm to 57 in/145.0 cm and the shoulder strap loops expand from 15.7 in/40 cm to 43.3 in/110 cm.